Recent Posts

Wednesday, 30 August 2017

Backup Route Configuration

Hi ! everyone on today we are going to learn about Backup Route on configuring both Router1 and Router2 in Packet tracer simulation. The starting procedure is that we have to do topology as shown below with the following details.


Now we should configure IP address on both PCs.


Assigning IP address on PC0


We should make sure that configuration is most important on Router0.


Similarly, after assigning Router0 move on to Router1 


Now you can see the screenshot that state of change to green color shown below:


Then we must do the verification on configuration on both Routers

Router0:

 Router1:

Thus, we can check both PCs could communicate well by these commands given below.
ping 1.0.0.2 in PC1 and tracert 1.0.0.2


Therefore, finally we have completed our lab session about how to configure backup route with the help of Packet tracer version 7.0.

Monday, 28 August 2017

Configure Router as a multiple DHCP Server

Configure Router as a multiple DHCP server

Hi !!! everyone on today we are going to learn and how to configure a router as a multiple DHCP server. Which has been mentioned below as screenshot for the following topology.

 
In this lab session we are going to see the process how did we configured DHCP server on both routers and how to configure multiple routers as already shown above as screenshot.

Configure on Router R1:


Configure on Router R2:


Now we can see the state in change to up which represent as green color shown in screenshot given below.


We can test in this troubleshooting of DHCP commands 

Router R1:


Router R2:


Finally, we have successfully completed our lab session about configuration a router as a multiple DHCP server in the cisco Packet tracer simulation version 7.0.
  

Configure Router as a DHCP client

Configuration of Router as a DHCP Client

Hi !!! everyone on today we are going see and learn about how to configure a router as a DHCP client in the given below topology.

What do you know about DHCP client ?

DHCP client is an Internet host using DHCP to obtain configuration parameters such as an IP address.
The configurable dynamic host configuration protocol client functionality allows a DHCP client to use a user-specified client identifier, class identifier, or suggested lease time when requesting an address from a DHCP server.
Configuration parameters and other control information are carried in tagged data items that are stored in the options field of the DHCP message.

Step 1: Now we can see in this lab that i have to configure Router R1 as DHCP Server 

Configuration on Router R1:


Step 2: After our configuration in R1 as DHCP server, we have to configure Router R2 as DHCP Client

Configuration on Router R2:


In the above screenshot we can look the command that R2(config-if)#ip address dhcp in which this command will automatically assign the ip address on Router R2 interface. Which is shown below as screenshot.


Note: IP address DHCP will assign ip on interface on which you will run this command and it will ask for ip from DHCP SERVER.Here in our this Lab DHCP SERVER is Router R1. But you can also configure a dedicated Machine as a DHCP Server.


Through this results shown in screenshot that we can see the change in state to up which shows as green color.

Step 3: We can check or test Router R2 interface whether it got IP address or not


Therefore, we have successfully completed our lab session on how to configure a router as a DHCP client with the help of Packet Tracer version 7.0.

Sunday, 27 August 2017

PAGP configuration to verify and troubleshoot

Configuration to verify and troubleshoot PAGP

Hi !!! everyone on today we are going to learn about how to configure in verifying and troubleshooting PAGP.

Do you know what is PAGP ?

Port Aggregation Protocol (PAgP) is a Cisco Systems proprietary networking protocol, which is used for the automated, logical aggregation of Ethernet switch ports, known as an ether channel.

The PAGP topology is given below as a screenshot by the following.


Step 1: Configure PAGP on switch S1


Step 2: We have to configure PAGP on switch S2


Step 3: Now we should verify Etherchannel port for configuration for switch S1


Step 4: After switch S1 verifying Etherchannel port lets move on for configuration in switch S2 


Therefore we have completed our lab session about PAGP configuration in verifying and troubleshooting in cisco Packet tracer version 7.0.

NTP Server and Client on a router

Configure NTP Server and NTP Client on a router

Hi !!! everyone on today we are going to learn about how to configure NTP server and client on a router.

What is NTP and its expansion ?

Network Time Protocol (NTP) is a networking protocol for clock synchronization between computer systems or PCs over packet-switched, variable-latency data networks.In operation since 1985, NTP is one of the oldest protocols in our current use in a network.

What do you know about NTP client or server ?

The Network Time Protocol (NTP) is a client/server application. Each workstation, router, or server must be equipped with NTP client software to synchronize its clock to the network time server. In most cases the client software is already resident in the operating system of each device.  


This is our configuration in NTP server or client topology given below as following screenshots.  

Step 1: We have to configure IP address on the router

Step 2: Now we can see some other time on router


After configuring router we can see the change in state to up which is connected to communicate shows green in color.

Step 3: In this step we can see screenshot to configure NTP server

Step 4: Now we should again go to Router and setup NTP client


After completing above step we have to do this step that we should again go to Router to confirm NTP configured or not. Which is shown below as screenshot.


In this screenshot we can see the date and time of this NTP server.

Step 5: After checking the clock we have to configure on NTP server for the status  


Finally, this will be our result for this lab session about how to configure NTP server / client on a router in cisco packet tracer version 7.0.

RADIUS Authentication configuration on a router for Telnet Access

RADIUS Authentication to configure on a router for Telnet Access

Hi !!! everyone on today we are going to learn about how to configure RADIUS Authentication on a router for Telnet Access. This is our assigned topology for this lab which is given below as screenshots.

Step 1: We have to assign the hostname, interfaces and IP address on Router R1


Step 2: Configuration on RADIUS server

Step 3: Now we should given information about router R1 that you want to use RADIUS server for Authentication

Step 4: We have to test Telnet Access from PC0


Finally, we have completed our lab session about configuration in RADIUS Authentication on a router for Telnet Access with the help of cisco packet tracert version 7.0.  

Telnet Configuration on Multi-layer Switch

Telnet Configuration on Multi-layer Switch 

Hi !!! Everyone today we going to learn about how to do Telnet configuration on Multi-layer Switch. Which is given in screenshots as topology method to understand.


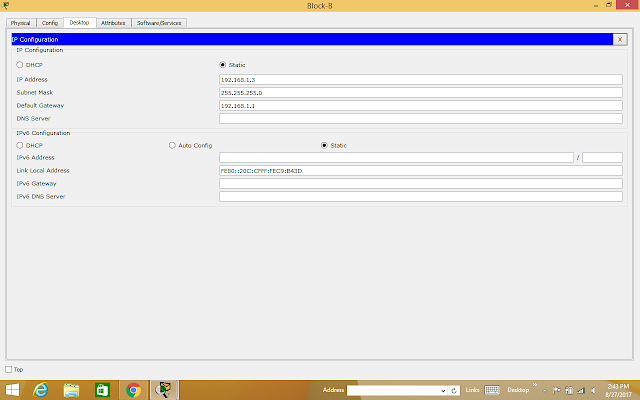
Step 1: We have to assign IP addresses to all the PCs to communicate.


Step 2: Configure on Multi-layer Switch

Step 3: Now we can check how to access a switch from all PCs

 Block-A


Block-B

Block-C

Block-D


Therefore, we have successfully completed our lab on Telnet configuration on Multi-layer switch with the help of our cisco packet tracer simulation lab version 7.0.

Popular Posts