RIP Tutorial in Packet Tracer
RIP expansion is Routing Information Protocol
For example: The main commands you are going to learn in this RIP is given below;
Router(config)#router rip ---> (it enables RIP as routing protocol)
Router(config-router)#network a.b.c.d ---> (a,b,c,d is the network number of the directly connected network you want to know)
You need to do only the class-full network number, not a subnet.
Explanation:
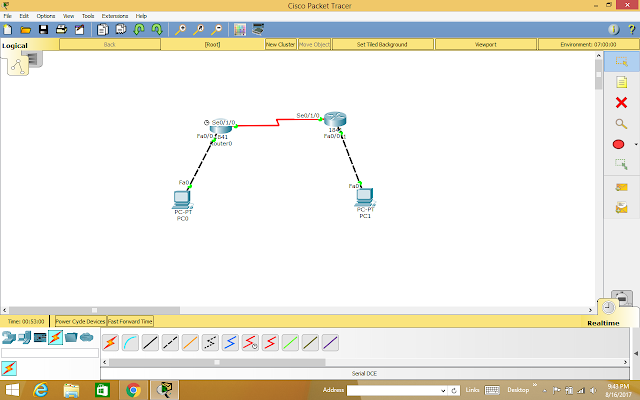
Lets apply RIP protocol on the following topology.
Now, we will follow the steps as mentioned in detail in the following:
i. We will assign IP addresses to all the fast Ethernet and serial interfaces respectively.
ii We will change the state of the interfaces from down to UP.
ii We will change the state of the interfaces from down to UP.
Then, after we are done with the basic step. We will apply RIP protocol commands on both routers.
Configuration of Router 0
(i.e. configuring both serial and fastEthernet interfaces.)
Configuration of Router 1
Assigning IP address on PC0
Assigning IP address on PC1
Router 0
In order to apply protocol RIP, we will write the following set of commands.
Router(config)# router rip
Router(config-router)# network 192.168.1.0
Router(config-router)# network 192.168.2.0
Router(config-router)# network 192.168.3.0
Router(config-router)# network 192.168.3.0
Router(config-router)#exit
Router 1
In order to apply protocol RIP, we will write the following set of commands on R2 as well.
Router(config)# router rip
Router(config-router)# network 192.168.1.0
Router(config-router)# network 192.168.2.0
Router(config-router)# network 192.168.3.0
Router(config-router)# network 192.168.3.0
Router(config-router)#exit
Finally, we have been completed our RIP lab simulation with result at last which is given as screen shot below;


No comments:
Post a Comment